Monday, November 30, 2009

Inlays & Heels

Big push to finish to work on the acoustics this week. We have to put the electrics on the back burner (though mine is cured and ready to be buffed and assembled) so we can get the acoustics into the spray booths asap. Today I inlaid my acoustic fingerboard with a simple fret marking theme. Below, a shot of the fingerboard drilled out for the mother of pearl dot inlays:


After drilling these holes, I set the inlays in place, packing some ebony dust and super glue around them. The below photo shows the inlays crudded up with dust and glue. Once the glue dries, a quick zap with some sandpaper levels everything out and erases all the excess garbage, leaving a clean fingerboard.


And the sanded finger board:


The rest of the day was spent carving the neck heel (where the neck meets the body):


View of the heel from the back:


Another mock up of the acoustic:


At this point I have to carve the rest of the neck, finalize the neck fit to the body and finish sand the whole guitar before the lacquer booth. This guitar is looking great!

We're getting there...

Saturday, November 28, 2009

Acoustic Shots

Here's a shot of my acousic headstock, inlaid with the G logo and mocked up with Schaller tuners:


A shot of the whole instrument mocked up. This coming week we'll be carving the neck and fitting it to the body.


First thing Monday I'll be pulling the electric off the drying rack, buffing the finish to its final shine and running through the final hardware assembly. This thing is almost done!! Below, Lady Carolyn holds G #1 just before taking off for Thanksgiving:

Tuesday, November 24, 2009

Acoustic Sprint Week!

We've got a short week to finish a TON of work on the acoustics. Since we're off Thursday and Friday for Thanksgiving, we've got two less days to get these guitars ready for the spray booth. As of last Friday afternoon, we've bound and fit the bottom wedge on the body; shaped and inlaid the headstock and are on our way to binding and inlaying the fingerboard. There is much to be done and I'm loving the fast pace of it all. We're being pushed to get a lot done quickly... we only have 8 weeks left! A couple shots:

The acoustic body: binding glued and taped on both top and back:

The back, taped:

The binding went on yesterday and I let it set up overnight, pulling the tape off this morning. It needs a bit of finessing (scraping, sanding and gap filling) before calling it 'done' but all and all everything came out looking pretty sharp. I'll post photos of the final sanded body and bottom wedge tomorrow.

Below, Joe Parker holds my Bigsby/Travis electric which is still hanging in the humidity room while the lacquer cures. Come Monday morning, it will be ready for wet sanding, buffing and final assembly. I should have my first guitar done in about a week... fingers crossed.

Thursday, November 19, 2009

Amps n' Acoustic Binding

I finished building my first amplifier yesterday. After a couple misplaced wires and some shoddy components blowing up (it wasn't my fault... honest!) I got this thing going and it sounds killer. For the amp class, all the students (and a few instructors) built the same amplifier from a kit sold by the Weber speaker company. Unfortunately, they stock some fairly cheap-o components with these particular kits, hence the blow ups: I had a filter cap and rectifier tube blow during the initial tests. Luckily, our instructors were ready for this and had better replacement parts on hand. This is pretty much as simple as tube amps get. The straight forward design allows for oodles of tone tweaking once the amp is completed. Swapping components out is a breeze and really opens up the possibility of dialing in a specific sound you're after. I've never really been one for geeking out on the subtle variances of vacuum tubes, swapping them out and comparing them; it just seemed like yet another black hole of endless tweaking in the world of guitar madness. But this simple amp allows for plenty of tinkering so maybe more of that will be in the future. Putting this amp together really makes you appreciate the stellar work of companies like Victoria or Blankenship. Their amps are flawless works of art. Open up the back circuit board of one of their amps and all the wires are immaculately soldered and arranged. The amp class was a lot of fun. I avoided getting electrocuted and now I have a pretty sweet lil' amp:


While the lacquer on my electric guitar cures over the next two weeks, all eyes are on the acoustics. Now that the body is all glued up, we are adding binding and the bottom wedge. The binding and wedge basically serve to hide the joinery between the wooden sides and the top & back. Basically, it cleanly brings the instrument together from an aesthetic point of view. Here's a couple shots of the work in progress: we use vacuum pumps to suspend the bodies of the acoustics while rough sanding the sides, making them smooth and perpendicular to the top & back prior to binding:


Yesterday we routed channels for the binding and purfling on the body. Below, Scotty routes his binding channels as instructor, Don, looks on to ensure a job well done:


Here's a shot of my acoustic body immediately after routing for binding and purfling. Purfling is an ornamental strip of thin material sandwiched below and/or inside the binding and the acoustic body. Besides hiding the joinery between the top, back and sides, the binding/purfling really frame the guitar's curves and gives the instrument a super clean look. Hopefully you can get a sense of the depth of the binding channel when looking at the top left of this image:


And the back:

Here's a shot of the bottom wedge as I fit it up. The wedge is another piece of rosewood (the same wood I'm using for the back and sides) with two thin pieces of maple tucked on either side that will eventually be mitered to match the rosewood/maple binding that will go around the top and back of the guitar... more on that as work progresses. While there are plenty of binding options to choose from, I kept it pretty simple and went with this simple setup so the maple purfling strips will give the guitar a clean pin striped look while the rosewood binding matches the back and sides.


And whadda ya know, I got home tonight and the good folks at Gretsch Discussion Pages/Tru-Arc Bridges mailed me a care package. Apparently they are producing 'official' Chet Atkins strings again and hooked me up with a couple free sets to check out... neato! Thanks Proteus!


Tuesday, November 10, 2009

Amp Building, Birdhouses and Lacquer

I signed up for an elective crash course in amplifier construction here at R-V. Over the course of two weekends, we'll be building a replica of the famous Fender Deluxe amp. The original 50's era Fender amps personify "the Fender sound" to many folks, and have long been favored in the studio for their rich tonal characteristics and low volume (which makes the recording process that much easier). While they're not particularly loud, they are absolutely chock-full-o-tone. Fender's tweed amps (known as such for their tweed fabric covering) were there when many rock n' roll classics were recorded: Buddy Holly, Chuck Berry, Gene Vincent, BB King etc. It's a sound we all know, if only on a subconscious level. The first time you plug into one, I guarantee a smile will pop across your face. It's a, "oh, THAT'S why everyone makes such a big deal about this amp" kind of experience.

Today, these classic amps are rare and costly, not to mention unreliable due to their old age. Over the last 15 years, there has been an explosion of small, boutique amp builders who offer a variety of the classic amps from Fender's 50's tweed era. (And yes, boutique means expensive.) The amp we're building, a copy of a Fender's 1959 5E3 Tweed Deluxe, is a benchmark for guitarists. It's a simple design and one that allows the builder a lot of room to swap components and really dial in the desired tone. Fender was one of a handful of companies that built both guitars and amps and as such, voiced both to suit each other beautifully.

First, a quick inventory of parts:


Schematic of the circuit:


In other news, the acoustic reached a major milestone today: the top, back and sides are finally glued together. Below is a pic of these three parts before gluing it all together. The bracing, sound hole rosette, joining the top and back plates, bending the sides etc are just some of the steps that we've taken to build these parts to the point where they are ready to be glued together and form an acoustic body.


The back gluing in on the go-bar deck:


Behold, the birdhouse:


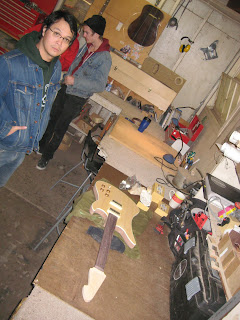
The electrics continue on towards completion. Here's another student in the spray booth, lacquering his guitar:


Below, electrics hanging on the rack to dry. Mine is in the center, prior to the amber tint top coat:


If all goes well, I'll finish the last couple coats of lacquer tomorrow at which point the guitar will hang for two weeks while the finish cures...

Thursday, November 5, 2009

Great Scott!!!


Fifty four years ago today, Dr Emmett L. Brown (above) of Hill Valley California made history by devising a way to change it. On that day in 1955, his radical idea of the flux capacitor (which as we all know is what makes time travel possible) came to the famous inventor through simple chance. "I was hanging a clock, slipped on the toilet and hit my head on the edge of the sink. When I came to, I had a vision... a revelation: the flux capacitor." Although it took him 30 years and his entire family fortune, the day finally came when he sent his dog, Einstein, exactly one minute into the future during the first time machine experiment. Local boy, Martin McFly VI, was on hand to video tape the historic occasion. "It was pretty heavy," was all the stunned youth could tell reporters after witnessing the Delorean time machine vanish, leaving twin fire trails on the wet pavement of Twin Pines Mall.

above: Doctor Brown's original sketch of the flux capacitor

below: Marty, in awe of Doc's invention:


Wednesday, November 4, 2009

Getting there...

The electric's mahogany back after three coats in the spray booth and some darkening pore filler:

Tuesday, November 3, 2009

You know that new sound you're looking for?!?

Well listen to this!!!

Pretty heavy: an unedited version of Marty's Johnny B. Goode circa 1955 (3 years before Chuck Berry made it famous!):

http://www.youtube.com/watch?v=d4Cr7kxjSBs&NR=1

Chet and Leo

Two amazing musicians and an equally great song: Chet Atkins and Leo Kottke doing Santo and Johhny's Sleepwalk:

Lacquer!

Well today we finally made it into the lacquer spray booth to apply the finish to our electric guitars. After a week of finish sanding, fret work and a host of other last minute, detail oriented things, I taped off the fingerboard and started to shoot the guitar with the first of many coats of lacquer. I'm guessing that I'll be finished with the first stage of this process this coming Monday, at which point the instrument will hang in a humidity controlled room allowing the lacquer to fully cure. So there's a chance I will have this thing buffed, wired and set up by the end of the month.

Joe Parker standing over his ready-to-be sprayed guitar, a design he based on one of his Teisco's:


Closer up:


Clamping and gluing in the frets on my guitar (I fit a piece of cardboard around the end of the neck to protect the face of the guitar during this process):


The fingerboard is then covered in low-tack tape prior to spraying the lacquer finish:


In the spray booth, note the spray gun to the right. Behind the guitar is a powerful fan which sucks the airborne lacquer out of the booth. You can't tell by this photo but the sky lights in the spray booth proved excellent natural light to scrutinize your work. When that first coat of lacquer goes on... wowee!!! Now we're cookin'! The figure in the wood grain starts to develop an amazing 3-D look:


After a coat, the guitar hangs to dry:


There are some great looking guitars being built by the students here at R-V. Here are a few of them hanging in the humidity room after the first day of spraying:


This photo really doesn't do the figure of the maple top justice:


And another amazing Arizona sunset over the grounds of R-V: